THE AWS SYSTEM MANAGER AGENT

The Amazon Web Service Systems Manager Agent (SSM) makes it possible for Systems Manager or AWS professionals to update, manage, and configure these resources. It is AWS own way of accessing the Elastic Compute Cloud machine just like the Secure Shell Session (SSH). The difference between the System Manager Agent (SSM) and Secure Shell (SSH) in accessing the server is that the SSH will require you to open a port (usually 22) and use of an IP address and or username, password or private SSH keys, while the SSM makes accessing the server using the AWS Identity Access Management service.
In many cases, the System Manager can be preinstalled in with an EC2 image during setup. However, it can also be configured on a custom EC2 server. Here, we configure the SSM with Terraform.
WHAT YOU NEED
To follow this guide, you will need
- Any command line interface e.g GitBash, Windows CMD, Linux CLI or Mac Terminal.
- Terraform installed on your local machine. You can check if Terraform is installed on your machine by typing
terraform --versionin your command line interface. - An AWS account with a SSM permission assigned to the user.
- Any IDE or code editor.
Once these are ready, let’s go through the process of installing a System Manager Agent in 7 Steps.
STEP 1 TO CONFIGURE YOUR SYSTEMS MANAGER AGENT
To begin, open your code editor and your command-line interface preferably on different screens. To confirm if System Manager Agent is installed or not, type sudo systemctl status amazon-ssm-agent in your CLI, your result should be Unit amazon-ssm-agent.service could not be found.
Next, you will create the bash installation script in the root directory of your terraform project.
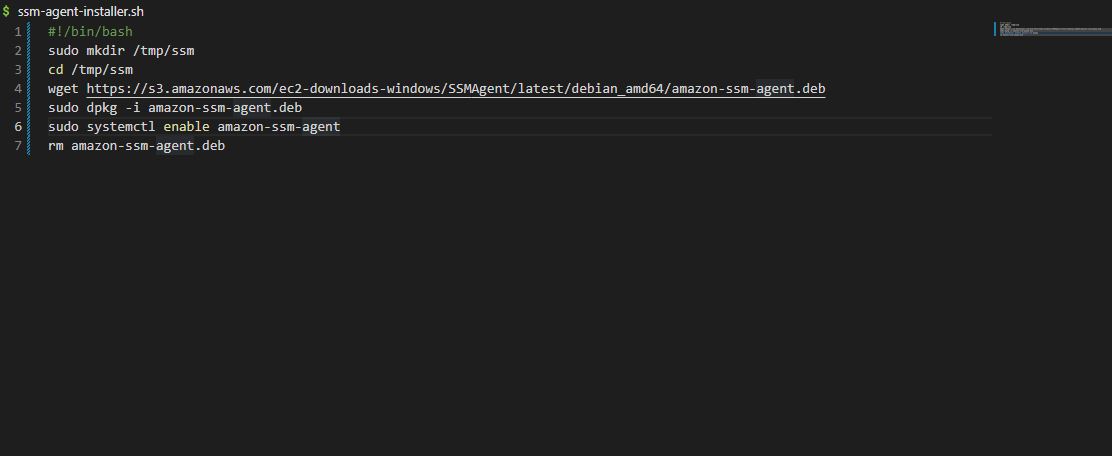
Paste the below script in the file.
!/bin/bash

sudo mkdir /tmp/ssm
cd /tmp/ssm
wget https://s3.amazonaws.com/ec2-downloads-windows/SSMAgent/latest/debian_amd64/amazon-ssm-agent.deb
sudo dpkg -i amazon-ssm-agent.deb
sudo systemctl enable amazon-ssm-agent
rm amazon-ssm-agent.deb
Save your file with ending with .sh (e.g ssm-agent-installer.sh)
STEP 2 TO CONFIGURE YOUR SSM AGENT
Create a data template provider in the terraform main.tf file. Pass the file name in the file parameter. In this case the file name is ssm-agent-installer.sh
data "template_file" "step-ssm-startup" {
template = file("ssm-agent-installer.sh")
}
STEP 3 TO CONFIGURE YOUR SYSTEMS MANAGER AGENT
Create your ssm role inside your terraform main.tf file and attach to EC2.
resource "aws_iam_role" "backend-server-role" {
name = "dev-step-3-0-backend-server-role"

#Terraform's "jsonencode" function converts a Terraform expression result to valid JSON syntax.
assume_role_policy = jsonencode({
Version = "2012-10-17"
Statement = [
{
Action = "sts:AssumeRole"
Effect = "Allow"
Sid = ""
Principal = {
Service = "ec2.amazonaws.com"
        }
      },
    ]
  })

tags = {
tag-key = "ec2-policy"
  }
 }
STEP 4 TO CONFIGURE YOUR SYSTEMS MANAGER AGENT
Create the instance profile still in your main.tf file. This will attach to your instance role.
This should instance profile is attached to the server IAM role.
resource "aws_iam_instance_profile" "backend-instance-profile" {
name = "backend-instance-profile"
role = aws_iam_role.server-role.name
}
STEP 4 TO CONFIGURE YOUR SYSTEMS MANAGER AGENT
Attach your policy to the server role so that you have a policy for your ssm agent.
resource "aws_iam_policy_attachment" "policy-attachment" {
name = "policy-attachment"
roles = [aws_iam_role.backend-server-role]
policy_arn = aws_iam_policy.policy.arn
}
STEP 5 TO CONFIGURE YOUR SSM
Create another server.tf file and create the EC2 instance and then pass your template file in the user data in your EC2.
resource "aws_instance" "backend-server" {
ami = data.aws_ami.AMI.id #"ami-0fb391cce7a602d1f" # ubuntu eu-west-2
instance_type = "t2.micro" #free tier eligible
availability_zone = var.availability_zone[1]
instance_initiated_shutdown_behavior = "terminate"
key_name = aws_key_pair.key.id
monitoring = true
subnet_id = aws_subnet.backend-subnet.id
tenancy = "default"
ebs_optimized = false
iam_instance_profile = aws_iam_instance_profile.backend-instance-profile.name
user_data = data.template_file.step-ssm-startup.rendered

vpc_security_group_ids = [ aws_security_group.SG.id ]

tags = {
Name = "dev-step-3-0-backend-server"
Environment = "Dev"
    }
}
STEP 6 TO CONFIGURE YOUR SYSTEMS MANAGER AGENT
Once all is done, deploy your terraform infrastructure, but, first check that your configuration has no syntax error.
terraform validate
In case you get an error about the provider not available, simply run terraform init, and the error will resolve.
Then check your resources that will be created with terraform, you should see the Systems Manger Agent as among the resources that will be created.
terraform plan
After that is confirmed, you can go ahead and apply the changes to your AWS infrastructure.
Run terraform apply
to deploy your configuration to your account. Enter yes when prompted for it.
Once the terraform finished deploying the configuration, navigate to your AWS account, under the connect options, you would be able to use your Systems Manager Agent (SSM) under the connect option.
You may also be interested in How To Publish AWS SNS in 3 Steps
Leave a Reply