Introduction
In one of the post were we discussed about the AWS most essential services, I mentioned the AWS Relation Database Service (RDS). The AWS RDS is Amazon’s own relational database service that allows you to deploy and manage relational database of your choice in the cloud. It makes it easy to operate and scale relational database engines. You can choose from MySQL, Postgresql, Oracle, MSSQL, SQL and Amazon’s Aurora database engine in the AWS Relational Database Service.
AWS Relational Database
AWS Relational Database Service (RDS) is a SQL database service that provides a wide range of relational database options to select from.
You can choose from Amazon Aurora, MysQL, MariaDB, PostgreSQL, Oracle, Microsoft SQLServer.
Amazon RDS service make it easier to set up, operate, and scale a relational database in the cloud. It provides cost-efficient, resizeable capacity while automating time-consuming administration tasks such as hardware provisioning, database setup, patching and backups. It frees you to focus on your applications so you can give them the fast performance, high availability, security and compatibility they need.
ec2 instance
Elastic Cloud Compute or EC2 instance or simply EC2 is an AWS Service that provides secure and resizable compute capacity in the cloud. It is a device (powerful computer) designed to make web-scale cloud computing easier for developers. You can create an EC2 instance through AWS console, command-line interface or the AWS SDK with the least amount of friction. By default you create root user when you lauch an instance, and also a default sudo privileged user giving you total control of your compute infrastructure. That means you have the capacity to increase the size, stop, restart, reboot, or terminate your instance. You can read more about EC2 instance here.
setup aws rds
Now, let’s walk through the setup of AWS relational database service and simultanously connect it to EC2 instance. You should check my tutorial on how to deploy and connect to EC2 instance.
Navigate to your AWS search console and type RDS. Select the first option, and in the new window, select Database at the left side menu. The click the Create Database.
DO NOT select the Create Database at the initial window, that will create an Amazon Aurora instead.

We will use the Standard create so that we have the full control of the deployment settings. Scroll down and select Standard Create.
I prefer to use the MySQL engine for this walk through. However, same sequence is applicable to other engine.

For the engine version, it is advisable to use the latest version. It is a security best practise. I also use the Free Tier for the sake of this walk through.

In the Settings, enter the Database Identifier name. This name is to identify your instance. It should not be mistaken for the database name. We will set that later.
In the next space, dropdown the Credentials Settings. Enter the Master Username for the database engine. This user will serve as the admin for the database with admin privileges. Also enter a strong password. You password should be alpha-numeric and atleast 8 characters long. ( I recommend 15 characters lenght password). Then also confirm the password.

Now, let’s select the instance type for our database engine. For the sake of this walk through, I will select the lowest class which is the db.t2.micro.

Also, select the General Purpose SSD. I have allocated 80GB for my storage and set the maximum storage threshold to be 100.

connect the ec2 instance.
The next section will help us connect our MySQL engine in AWS Relational Database Service to our EC2 instance server. I already created one. You can follow this tutorial to an EC2.
Select the Connect to an EC2 compute resources. Then select the EC2 you want to connect to from the dropdown list.

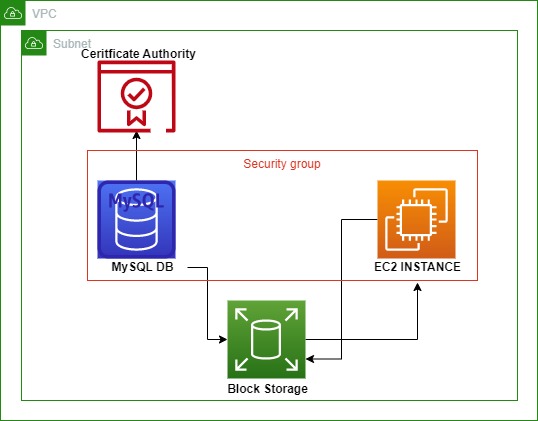
For the Subnet, I choose the Automatic Setup so that AWS create on for me during deployment of the AWS Relational Database. For the Security Group, I Choose Existing one I created before. The security group allows inbound traffic on port 3306. 3306 is the defualt port for MySQL database engine. Now, let’s move to the next part.
Also notice that AWS does not grant public access to our database server at time of creating it. You can change this under the Modify settings after the database is successfully deployed.

For the an add security of the database server, under Certificate Authority, I used the default certificate from AWS. Also, I dropped down the Additional Configuration to make sure the port is 3306 that I allowed in my security group.

For the Database Authentication, I used the Password Authentication. This will enable me to use the password I set earlier. You can also stored you credentials in the AWS Secret Manager service and pass the parameter for the relational database to use.

Now we will set up Monitoring for our database engine. Monitoring gives visibility into the state of our database and the amount of resources it is using.
Select the Check box for Enable Enhanced Monitoring. Granularity to 5 Seconds, and attached the default role which AWS RDS will create while creating the database engine.

create initial database, and backup
We create the Initial Database Name and the backup in this part of our walkthrough. You can create more database for different schemers once the database is up and running.
Enter the name of the Database. I used the demodb name. I selected the default parameter group and the option group too.
Check the Enable Automated Backups box. I used 1 days retention for the sake of this walkthrough. It should be higher for a production scenerio.

Then choose the backup window and select the time range when AWS will take the backup of the MySQL Relational Database engine. Take now that the time is in UTC, so, you should do a conversion to your local time for accurate backup time.
Also, take note that AWS created an IAM service linked role for CloudWatch logs.

The final step is to check summary estimates and then click the Create Database.

wait for AWS to create the Database
Once you click the create database, it will take a little while for AWS to create the database with RDS service. It will also take an initial backup of the database after connecting to the AWS EC2 instance as specified in the configuration steps.

You can confirm the database deployed from the list of the AWS Relational Database engines in your console.

conclusion
The AWS Relational Database Service (RDS) is a powerful service to deploy, operate and scale your relational database engines. Also, the SQL engines can enjoy for AWS own security measures. You can also use the Multi AZ deployment to achieve High Availability for your database.
If you only followed this tutorial for learning purpose, I recommend you delete the database engine to avoid any potential billing from the snapshots and backup.
Click on the database identifier name, then select the Actions, and select Delete from the dropdown. In the pop up box, uncheck the Create final snapshot and Retain automated backups. Only select the Acknowlegment box and enter the words delete me in the box. Then click Delete.

Thanks for following this far. Check out other post on the most essential aws services too.
Leave a Reply