introduction
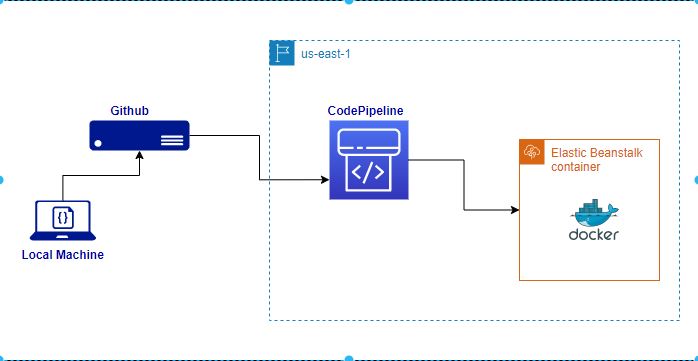
This is another tutorial off the AWS CodePipeline and AWS Elastic Beanstalk I did previously. It is important to know how to save time resource when working as a DevOps, and also know how to make web deployment efficient. So, I thought to make a post on how to use AWS Pipeline to continuously deploy Elastic Beanstalk application with no downtime from GitHub.
One advantage of using this method is it saves you time of reuploading your application everytime a change is made. You will not need to zip it except the first time you deploy it.
The previous tutorial on deploying Elastic Beanstalk is a prerequisite to this one so head over and follow the walk through.
create connection for github
We will start by creating the Connection for our Github and CodePipeline. So, click the Create Connection under Code Pipeline.

Select Github in the next screen that comes. Add a name to identify the connect, and then click the Connect To GitHub. This will connect your pipeline with Github and Elastic Beanstalk

In the next window, click the Install a New App to initiate a new connection from your GitHub.

It will take you to the Connector For GitHub window to select the repository. I select the organization and repository that was created from a previous tutorial

Once you select the Organization, you will be asked to select the repository. I recommend you do not select the All Repositories option, rather, use the Only Select Repositories. Select the specific repo from the drop down and click Install.

Once it is install, you will be returned to the AWS Code Connection page with the new connection id automatically populated in the GitHub App section. After that, go ahead and click the Connect button.

You will get an Available status like the below once the connection is created.

configure pipeline
After we have been able to create the connection, the rest of the process is to create the pipeline for our deployment. The pipeline will take our changes from GitHub and run it through to deployment on Elastic Beanstalk.
You need to have your application running on Elastic Beanstalk before you can create a pipeline for it. You can follow this earlier tutorial here.
So, click on Pipeline under Code Pipeline. I recommend you follow this tutorial on how to create a Code Pipeline using EC2 in AWS too.
Give your pipeline a name, use the New service role so that AWS Pipeline creates the role for us.
However, If you choose to create a role, I recommend you follow this tutorial. Then come back and select Existing Service Role, then choose the role you created.
Take note to check the small box to Allow AWS CodePipeline to create a service role so it can be used with this new pipeline.
Click on the Next button.

create source stage
Here, we will select GitHub (Version 2). We are using this version because we have earlier setup the connection with the pipeline. Therefore, we can easily select the configuration from the Connect list.
Select the Repository name, and also the branch you want the Pipeline to deploy from. Also, check the box that says Start the pipeline on source code change. Leave the Output Artifact Format as the Code Pipeline default. Then click on Next button.

Next stage is the build stage which you can skip for the Deploy stage.
create deploy stage
The deploy stage is where we will specify the platform for our deployment. In the Deploy Provider, select AWS Elastic Beanstalk from the dropdown options, use the Region closest to you (and the same region you deploy Elastic Beanstalk to earlier).
Once you selected Elastic Beanstalk, you can select the Application name and the Environment name of the application. Click on Next.

The next page will present you will the summary of your pipeline configuration. Once you are okay with the review, click on Create Pipeline.

You should see your pipeline running in the stages you configured with Elastic Beanstalk and GitHub and a Succeeded message after the it finish running the application.

Grab the application URL and see that you application is deployed well
create some changes
Now, we will make a simple change to our application, push it to Github and expect the AWS Pipeline to pick up the changes and deploy it into our Elastic Beanstalk Application.
So, I opened the source code in my VScode (you can also clone from here). I made a simple text change inside the index.tsx file, and added some extra Learn About Beanstalk From Oxla.io text.

I commit and push the changes to Github from the command line.
git add .
git commit -m "added some beanstalk stuff"
git push

Once I pushed it, I returned to check my pipeline, and lo, it picked up the changes from GitHub, run the whole deployment process, and deployed my changes in to Elastic Beanstalk

Checking the URL again, I can now see my changes.

conclusion
And that is a good way to use Elastic Beanstalk to automate deployment of your web application using AWS Pipeline.
troubleshoot
- ERROR: 100.0 % of the requests are failing with HTTP 5xx.
SOLUTION: The means the application deployed successfully, however, it could not be served. Check that the zips artifacts are the correct files and directories compiled to run the application. For Next, check that you compiled the build into a standalone subdirectory inside the .Next directory after the build. - ERROR: Getting a 502 error after the deployment completes with a severe health status.
SOLUTION: Change the start command inside the packaga.json from “next start”, to “node server.js” or “node startfile.js”. Where the startfile.js is your script that is responsible to start your application.
Leave a Reply