Background
In the previous post, we saw how to install dotnet 5, 6, and 3.1 in our EC2 Ubuntu server. So, it happened that we could go a little further by hosting our dotnet API application on the server and also serve it using Nginx proxy server. The Nginx will serve the dotnet API application using the domain URL and finally secure it with SSL certificate. This might look like a lot now, but I promise, you will find this much easier than it appears using this walk-through.
deploy dotnet api application
I believe you already have your application on your source code repository. Clone the dotnet API application from Github or from any source code repository you use.

Run the dotnet clean to remove the output of the previous builds from the application.
sudo dotnet clean

Run the dotnet build to build the application package and all it dependecies into a set of binaries.
sudo dotnet build

The dotnet publish command will compile the dotnet API application, read through its dependencies specified in the project file, and publishes the resulting set of files in a directory for hosting.
sudo dotnet publish

create systemd service file
Now, because we would want our deployed dotnet API application to keep running in the server without shutTing down, using the dotnet run command will not suffice to keep it running. We have to use the server systemd service to run the dotnet application. In that case, we will create the configuration file in the systemd/system directory on our server, and add the Service file for the API application. Make sure to modify the details to suite your application.
It is also importance to name your service file the same name as your application. That will make identifying each service files easier in case of multiple services.
sudo nano /etc/systemd/system/applicationName.service

Add the configuration below to the service file. You can copy the snippet and modify to suite your application.
[Unit]
Description=API on UBUNTU Nginx

[Service]
WorkingDirectory=/home/path/To/YourProjectDirectory
ExecStart=dotnet run --urls "http://+:6996"

Restart=always
# Restart service after 10 seconds if the dotnet service crashes:
RestartSec=10
KillSignal=SIGINT
SyslogIdentifier=api-name

User=root

[Install]
WantedBy=multi-user.target

Once you have done that, reload the systemd daemon to pick up the new changes to the Systemd service.
sudo systemctl daemon-reload

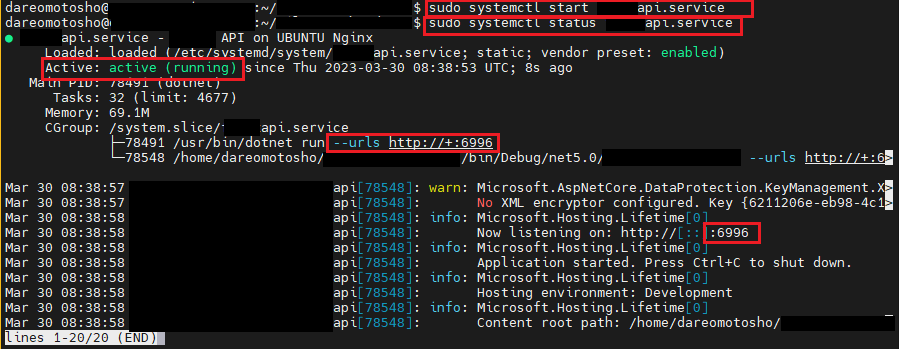
Thereafter, start the application service with the name of the service file you created in previous step. We will also check the status of our application service.
sudo systemctl start yourServiceName.service<br>sudo systemctl status yourServiceName.service
Once you get the log displayed on the screen, take note of the Active state, and the port number you assigned to your dotnet application in the service file.

serve dotnet API application With Nginx Proxy
Great job so far. You have done well to deploy dotnet API application in your Ubuntu server, now, let’s serve it to the public using an Nginx reverse proxy web server.
This step is important for securing the dotnet API application and the server IP address. You do not want to give out your server IP address to the public, neither will the Frontend that will implement the API be able to use the IP address conveniently for the endpoints.
Now, you will head out of the server environment to your domain name management console, there you will create the URL where you application will point to. I use Cloudflare to manage my domain name. Yours might be different.
Create the A-record and point it to your server IP address. Save it, and then let’s create an Nginx configuration to serve the application to this URL from the server.

So, we will head over to the Nginx configuration directory on our server and create the configuration file for our application. We will map the created A-record domain name for our application to Nginx web server. You will also need to install Certbot for installing an SSL certificate on your domain. Kindly check this post to see how to install a Certbot service on Ubuntu.
sudo nano /etc/nginx/sites-enabled/api

Paste the configuration below in your file. Take note to replace the server name the one you created, and the proxy pass port number with the one your API is serving with.
server {
        server_name api.domainName.io;
        location / {
             proxy_pass         http://localhost:6996;
             proxy_http_version 1.1;
             proxy_set_header   Upgrade $http_upgrade;
             proxy_set_header   Connection keep-alive;
             proxy_set_header   Host $host;
             proxy_cache_bypass $http_upgrade;
             proxy_set_header   X-Forwarded-For $proxy_add_x_forwarded_for;
             proxy_set_header   X-Forwarded-Proto $scheme;
             proxy_set_header   X-Real-IP $remote_addr;
    }
}

Now, you can use the Nginx -t command to check that there is not syntax error in your nginx configuration.
sudo nginx -t
The command above should give you a successful reponse. Now we will install the SSL certificate with Let’s Encypt Certbot.
sudo certbot --nginx -d api.domainName.io
You will be prompted to confirm the redirect of your domain name. Select the 2 option for a full HTTPS redirect on all request.

Once the process is done, you will get a successful message like below.

checking with web browser
Now, head over to your web browser and access your API application using the address you created for it.

conclusion
And that is it, you have successfully hosted you dotnet application. Also, see how to host dotnet API application using docker container in our server. I especially like using docker to host APIs because of it’s flexibility. With docker, you would not need to worry about install any specific dotnet version on your machine, that is because you can specify it in the dockerfile.
I trust you find this useful, kindly check out other tutorials from oxla.io and share to your circle.
troubleshooting
- ERROR: exit code 134
SOLUTION: This is a memory issue. Free up server space.
It could also be the user in the systemd configuration. Change the user. - ERROR: status=150
SOLUTION: Check the version of the package installed and change to what the app requires. - ERROR: A fatal error occurred. The folder [/usr/share/dotnet/host/fxr] does not exist
- SOLUTION: This happened when you check the dotnet version on a newly installed dotnet. It is caused when there is conflict in the dotnet package manager to use inside the server. You can resolve by using one of either microsoft or ubuntu package. See the full resolution of the error in this post.
Leave a Reply