Background
So, you have been asked to create a build stage using the AWS CodeBuild for the new application that your developers just built. The application will build a docker image, and send it to the Amazon Elastic Container Registry (ECR). The service is supposed to pick up the code from your configured AWS CodeCommit repository and push it to the appropriate build environment i.e production or staging build. CodeBuild is one of the core AWS services that make up the AWS Pipeline.
Well, if you find yourself in that situation just like I did some time ago, you have nothing to worry about as the AWS CodeBuild is pretty interesting service to work with.
The AWS CodeBuild is an AWS managed build service that helps to compile source code from source code repository, run units test on the code, build the code and, store it in a configured artifact repository. The AWS CodeBuild is a scalable service, meaning it can increase its resources if your project build requires more resource to build. CodeBuild also provides prepackaged build environments for popular programming languages and build tools such as Apache Maven, Gradle, and more. It also allow you to customize build environments to use your own build tools.
Let’s get started
So, we begin by creating the Build projects. Click the Build Project in the left pane, and then the orange Start Build project. Also take note that I have added some common errors and solutions at the buttom of this tutorial to make your deployment as seemless as possible.

Go ahead and add the name for your project in the Project Configuration pane. The desription is optional but I choose to add it.

Once that is done, select the Source that will feed the builld stage. Here, we choose the AWS CodeCommit and select the repository. (Check here for a quick guide on creating AWS CodeCommit repository). After that, select the branch to be deployed. Leave the Commit ID blank.

configure the build enviroment
Under the Environment field, you will configure the build environment for your application. This should not be mistaken for the deployment environment which is the interface that helps the user consume the application.
Choose the Managed Image, and Ubuntu for the Operating System. Then, select the Standard runtimes. Also, we will use the aws/codebuild/4.0 image (you can use the latest if 4.0 is no longer in support). Select to use the latest image runtime version of Image Version. For the environment type, we will use Linux ( Ubuntu is a Linux operating system).

Check the privilege box
Ensure to check the box for Privileged option. This is an important step if you want your build to run privileded (sudo) commands. It will also be needed if you will be using your build in the AWS CodePipeline. You can then continue to select the IAM role for your AWS CodeBuild. I already created a role which is name codebuild-admin-app-service-role. You can follow this guide to also learn t create AWS IAM. Otherwise, you can ask AWS CodeBuild to create one by selecting the New Service Role option.
configure compute capacity for and Environmental Variables for AWS CodeBuild
In the next options, the 3GB memory, 2vCPU capacity will be enough for this walkthrough, and except your application needs a huge amount of resources to build, you may want to leave it that way.
Next, enter the Environmental Variables. This includes the AWS_DEFAULT_REGION, AWS_ACCOUNT_ID, and because we will be pushing our build to the AWS Elastic Container Registry (ECR) we include the IMAGE_REPO_NAME and IMAGE_TAG.

add buildspec.yml file
This part of the configuration makes the difference for AWS CodeBuild. Here you will specify the buildspec.yml file. The buildspec.yml or buildspec.prod.yml file contains the commands you want to execute to build your application. In this case, the docker commands to test, build, and push the docker image to the AWS ECR. AWS CodeBuild will expect to find the buildspec.yml file at the root of your project repository. Therefore, you need to create one there.

Go back to your AWS CodeCommit, and create a new file with the name buildspec.yml. Then paste the snippets below inside. Then commit the file.
version: 0.2

phases:
  pre_build:
    commands:
      - echo Logging in to Amazon ECR...
      - aws ecr get-login-password --region $AWS_DEFAULT_REGION | docker login --username AWS --password-stdin $AWS_ACCOUNT_ID.dkr.ecr.$AWS_DEFAULT_REGION.amazonaws.com
  build:
    commands:
      - echo Build started on `date`
      - echo Building the Docker image...
      - docker build -t $IMAGE_REPO_NAME:$IMAGE_TAG .
      - docker tag $IMAGE_REPO_NAME:$IMAGE_TAG $AWS_ACCOUNT_ID.dkr.ecr.$AWS_DEFAULT_REGION.amazonaws.com/$IMAGE_REPO_NAME:$IMAGE_TAG
  post_build:
    commands:
      - echo Build completed on `date`
      - echo Pushing the Docker image...
      - docker push $AWS_ACCOUNT_ID.dkr.ecr.$AWS_DEFAULT_REGION.amazonaws.com/$IMAGE_REPO_NAME:$IMAGE_TAG
The file above will login to the ECR created, build the docker image using the AWS CodeBuild environment, and push the image to the ECR repository. Take note of the environmental variable as used in the file. They are the same environmental variables configured earlier in this walkthrough.
create the AWS CodeBuild Project
Once you have created the buildspec.yml file and added the name in the buildspec stage, go ahead and click the orange Create Build Project button.

Conclusion
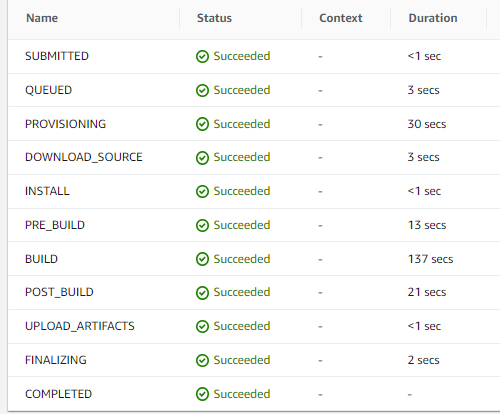
Once you clicked the create, the application runs the build and should give you the succeeded response as the image above. With this, you can be sure your application has been packaged and sent to the amazon elastic docker registry ready for deployment with the AWS CodeDeploy.
Also see this post on how to configure AWS CodeDeploy with Github in 7 steps.


troubleshooting aws Codebuild
I have added some common error and their solutions you may experience during your configuration below. I also experience these issues so you should not panic when they occur.
- ERROR: YAML_FILE_ERROR: YAML file does not exist
SOLUTION: This could be that the buildspec.yml is mispelled or have another name. Correct the name and retry. Also, it could be the buildspec.yml is not committed directly to the branch specified in the branch. Commit the file directly instead of making a PR. - ERROR: Cannot connect to the Docker daemon at unix:///var/run/docker.sock. Is the docker daemon running?
SOLUTION: Go to the environement setting of the codebuild project, under override image, scroll down and make sure you check the Privileged box. Also, ensure to select the corrrect server environement type, and Standard runtimes. Ref:https://docs.aws.amazon.com/codebuild/latest/userguide/troubleshooting.html#troubleshooting-cannot-connect-to-docker-daemon - ERROR: AccessDeniedException: User: arn:aws:sts::836768216030:assumed-role/codebuild-admin-app-service-role/AWSCodeBuild-087b4fae-a75b-4e24-911b-8b1778a1835a is not authorized to perform: secretsmanager:GetSecretValue on resource:
SOLUTION: You will need to use the Create Inline policy to generate it as no aws managed policy for it. Select SecretManager, then check the GetSecretValue. Select CodeBuild under Resources. Then add the arn for secrets manager.
Ref:https://stackoverflow.com/questions/66757368/getsecretvalue-operation-is-not-authorized-error-with-aws-secrets-manager - ERROR: The deployment failed because a specified file already exists at this location: /home/ubuntu/********/.gitignore
SOLUTION: Go inside the server in the file location and delete the file. The file could be a hidden one, use the ls -la or ll command to view them. Then rerun the build project.
Leave a Reply